Creating a Venn diagram
The Venn panel builds set diagrams straight onto the slide — with 2 to 7 sets, either as a complete Venn or as a ring arrangement. Texts and colours can be set per area, and the appearance saved as a template. A diagram you have already created can be read back and edited at any time instead of being rebuilt.
Standard licence and up
The Venn panel is part of the Standard licence. It is not available in Free or Trial.
Opening
On the ribbon, go to PPPTools → group „Venn (neu)" and click Venn-Diagramm. The panel opens on the right.
It has three tabs: Einstellungen (structure and templates), Texte (all labels) and Format (colours and lines). The buttons Neu erzeugen (create), Aktualisieren (update) and Einstellungen aus markiertem Diagramm übernehmen (read back from selection), together with the status line, are fixed at the bottom and reachable from every tab.
Structure
Sets and arrangement
| Setting | Effect |
|---|---|
| Mengen | 2 to 7 circles |
| Anordnung | Vollständiges Venn — every intersection · Ring — only neighbouring circles overlap |
| Mitte als eigene Fläche | Ring only (4 sets and up): draws an actual circle in the centre — a separate area with its own fill colour and text (listed as „Mitte" in the Texte/Format tabs) |
| Ausrichtung | Where the first set sits: top, right, bottom, left |
| Titelposition | Diagram title above, below, left or right |
| Durchmesser | Circle size in points (10–500) |
| Abstand | Distance between circle centres in points (10–500) — a smaller value means more overlap |
At the top of the Einstellungen tab a small live preview shows the circle layout. It reacts instantly to the number of sets, orientation, arrangement and size — so you see the result before placing it on the slide.
How many areas will there be?
In a complete Venn the area count grows fast: 3 sets give 7 areas, 4 already 15, 5 as many as 31. The ring stays manageable (6 sets = 13 areas). The line below the arrangement always shows how many areas the current settings produce.
Orientation (Ausrichtung)
The orientation rotates the whole diagram — it decides where the first set (A) sits:
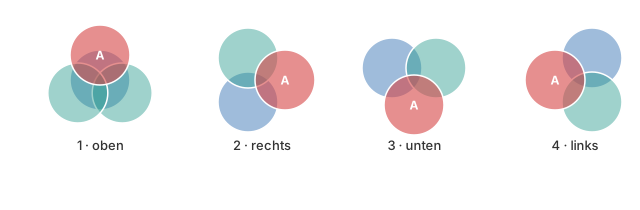
Arrangement: complete or ring
This is the key decision as soon as there are more than three sets:
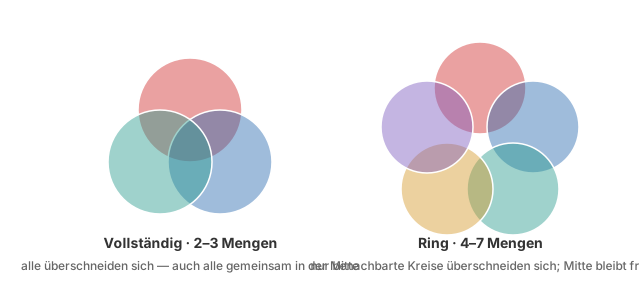
- Vollständiges Venn (complete) — every circle overlaps, all of them together in the centre. The classic Venn diagram. With circles it is only complete up to 3 sets (that is geometry, not an add-in limit). From four sets onwards, some areas are inevitably missing.
- Ring — the circles are placed around a ring, only neighbours overlap and the centre stays open. This is the arrangement seen on business slides and the right choice from 4 sets on. Works up to 7 sets. With the Mitte als eigene Fläche option you can, from 4 sets on, add an actual centre circle that shows a shared core and can be coloured and labelled like any other area.
For 2 and 3 sets both look the same
This is not a bug: a complete Venn with 2 or 3 circles already is a ring. The difference only becomes visible from 4 sets onwards.
If you pick Vollständig with four or more sets, the panel points it out: the note below the arrangement switches to the accent colour and states how many areas actually appear. Areas that cannot be drawn are greyed out in the Texte and Format tabs.
Cutting areas apart
By default the circles stay whole and the blended colours come from transparency. This is robust and works with any number of sets.
With Flächen echt zerschneiden the circles are split into genuine separate areas instead. Every intersection then becomes its own shape and can be coloured freely — including a colour that mere overlaying would never produce.
Cutting works with any number of sets. Only the areas that actually exist for the chosen arrangement are created — in a ring these are the single sets and the neighbour intersections, so a manageable number. A complete Venn with many sets produces very many areas (5 sets = 31); there the ring is usually the better choice.
Texts
The Texte tab has three blocks that adapt automatically to the chosen number of sets:
| Block | Content |
|---|---|
| Titel | The diagram title |
| Beschriftung der Mengen | One label per circle, outside the diagram |
| Texte in den Flächen | One text per area — „Nur A", „A ∩ B", „A ∩ B ∩ C" … |
Every row has a button on the right showing the current font (e.g. Arial 14). Clicking it opens the font picker including colour.
Empty fields create no shape. If you only want to label the three circles, simply leave the area texts empty — no empty text frames will be placed on the slide.
Insert example texts fills every field — title, sets and areas — with a themed example for the current number of sets (2–3 sets an animal example, 4 sets IKIGAI, 5 sets Customer Journey). It overwrites all existing texts; if you have already typed something, it asks once first. This keeps stale area texts from lingering when you change the number of sets.
Format
Mode
| Mode | Behaviour |
|---|---|
| Alle Flächen wie die erste | One setting applies to every area. Clear and simple, and with transparency the blended tones appear by themselves. |
| Jede Fläche einzeln | One row per area with its own values. |
From about a dozen areas onwards the panel points out that the first mode is usually more practical.
Values per area
| Value | Range |
|---|---|
| Füllung | Fill colour — click opens the colour picker |
| Transparenz | 0–100 % |
| Linie | Outline colour |
| Stärke | 0–6 pt — 0 hides the line |
Hover over a colour field and the tooltip tells you what is stored there: either a hex value or a theme slot such as "Akzent 1, Heller 40 % — folgt der Vorlage" (follows the template).
Do Venn colours follow the template?
Yes — as far as they can. Pick a theme colour in the colour picker and the diagram remembers the slot instead of the colour value. When the presentation switches to a different design, those areas move along — no need to rebuild the diagram. This applies to fill, outline and font colour alike, and it survives when you save your own template.
Three things stay fixed values by their nature:
- Blended intersections.
A ∩ Bis a mix of two base colours — PowerPoint has no theme slot for that. With three sets, A, B and C follow the template; the intersections do not. - Gradient schemes. They compute intermediate steps, which is no longer a slot either.
- The built-in templates (Default, Complementary, RGB, Creative Moon, Only Two). Those deliberately carry fixed colours; the only design-dependent scheme is Foliensatz-Farben.
A diagram that follows the client's design
Apply the Foliensatz-Farben scheme — the set areas then carry a real reference to Accent 1–6. The same diagram takes on the design of whichever presentation it sits in.
Colour scheme (Farbschema)
Instead of colouring every area by hand, pick a ready-made palette under Farbschema and click Anwenden. A colour scheme is a palette of base colours — one per set; the intersection colours are derived from them (blended, and a little darker with nesting depth). Every scheme therefore adapts automatically to 2 to 7 sets.
The same palettes as in the Wordcloud tool are available — from Neon, Pastell and Ozean through Nordic, Beere and Sonnenuntergang to Foliensatz-Farben (the accent colours of the active design — stored as a reference, see above). The other design palettes are now available too — Template-Farben (aktives Design), Template-Akzent einfarbig and Akzentfarbe + Grau (Top hervorheben). Plus gradients such as Blau → Türkis or Violett → Pink: these are stretched evenly across the sets, producing a smooth colour gradient around the whole ring.
Scheme first, fine-tune after
Apply a colour scheme, then adjust individual areas in Jede Fläche einzeln mode. The scheme only sets colours — texts, fonts and geometry stay untouched.
Templates
Five templates are built in: Default, Complementary, RGB, Creative Moon and Only Two. Your own templates are stored per user and are therefore available in every presentation.
A template only carries the appearance
Applying one takes over geometry, colours and fonts — the texts you have already entered stay in place. So you can run a fully labelled diagram through several templates without losing its content. Conversely, a template never stores texts.
Built-in templates can neither be overwritten nor deleted.
Creating and changing
| Button | Effect |
|---|---|
| Neu erzeugen | Places a new diagram in the centre of the active slide |
| Aktualisieren | Redraws the diagram last created or read back — at its current position |
| Einstellungen aus markiertem Diagramm übernehmen | Reads a diagram on the slide back into the panel |
The last one is the actual workflow for changes: click the diagram, read it back, adjust it in the panel, update. All settings including the texts come back, because they are stored inside the presentation — even after closing and reopening the file, and on a different machine too.
Examples
A classic three-circle Venn
- Set Mengen to
3 Mengenand Anordnung toVollständiges Venn - Apply the Default template
- In the Texte tab, label the three sets and leave the area texts empty
- Click Neu erzeugen
Four areas as a ring
- Set Mengen to
4 Mengenand Anordnung toRing - Switch on Mitte als eigene Fläche if a shared core should be shown — this creates an actual centre circle that you label under „Mitte" in the Texte tab and colour in the Format tab
- Set the format mode to Alle Flächen wie die erste, transparency around 40 %
- Click Neu erzeugen
Highlighting one intersection
- Mengen
3, switch on Flächen echt zerschneiden - Set the format mode to Jede Fläche einzeln
- Give
A ∩ B ∩ Can accent colour and transparency0 - Click Neu erzeugen
Notes
- The diagram is inserted as a group and can be moved and scaled as a whole.
- Changes to size or position on the slide survive an update — the diagram is rebuilt around its centre point.
- Cut areas are ordinary PowerPoint shapes: if you recolour individual areas by hand after creating them, those changes are lost on the next update.
- Text boxes size themselves to their content and are centred on their area.
Number Fields
The number fields in this tool have up/down arrows with a step size that matches the value; a value outside the limits is nudged to the nearest permitted number when you leave the field. The preview recalculates as soon as an entry is committed — Enter, a click next to the field, or an arrow click. Described in full under Number Fields With Arrows.